Mastering JavaScript: 30 Hands-on Projects for Beginners (Project Series 1/30)
Understanding JavaScript fundamentals by building a Background Colour Changer
It is common to see newbie frontend techies getting comfortable with HTML, making good progress with CSS, but getting stuck with understanding JavaScript. While some stay on course in trying to decipher how the language works, some give up at that point and eventually venture into no-code tech roles like UX design, product management, and the like in order to escape facing the tough music of JavaScript, especially when it is their first programming language.

The article series aims to build your mastery of the JavaScript language by building 30 simple projects. After building the projects, you'll feel confident enough to pick up any JavaScript framework.
Introduction
JavaScript is a programming language that is simply used to add interactivity and other dynamic features to websites. It is a client-side language, which means that the code is executed by the user's web browser rather than on a server. JavaScript is primarily used on the frontend, or client-side, of web development, but it can also be used on the backend, or server-side, using technologies such as Node.js.
HTML and CSS is not enough
HTML and CSS alone will not make you a developer. With JavaScript, you can create interactive elements such as dropdown menus, image sliders, and form validation. It can also be used to update web page content dynamically, without the need to refresh the page. JavaScript's popularity has led to the development of a wide variety of frameworks and libraries, such as React, Angular, and Vue, that make it easier to build complex and feature-rich web applications. Since you're most likely going to be using any of the listed frameworks in your career, you'll need some reasonable knowledge of Javascript. JavaScript is a versatile programming language that plays an essential role in the development of modern websites and web applications.

For the next 30 days or so, I'll be building 30 basic JavaScript projects that will cover almost all the fundamentals of JavaScript and help you understand how the different parts of the language come together. The level of difficulty for these projects is progressive, so you will have to follow them sequentially. The basic frontend requirement for building these projects is that you should be comfortable with HTML and CSS. I will only explain the JavaScript codes since that is the focus of learning, for this projects.
Enough with the talk, let's build!
Project 1: Background Color Changer
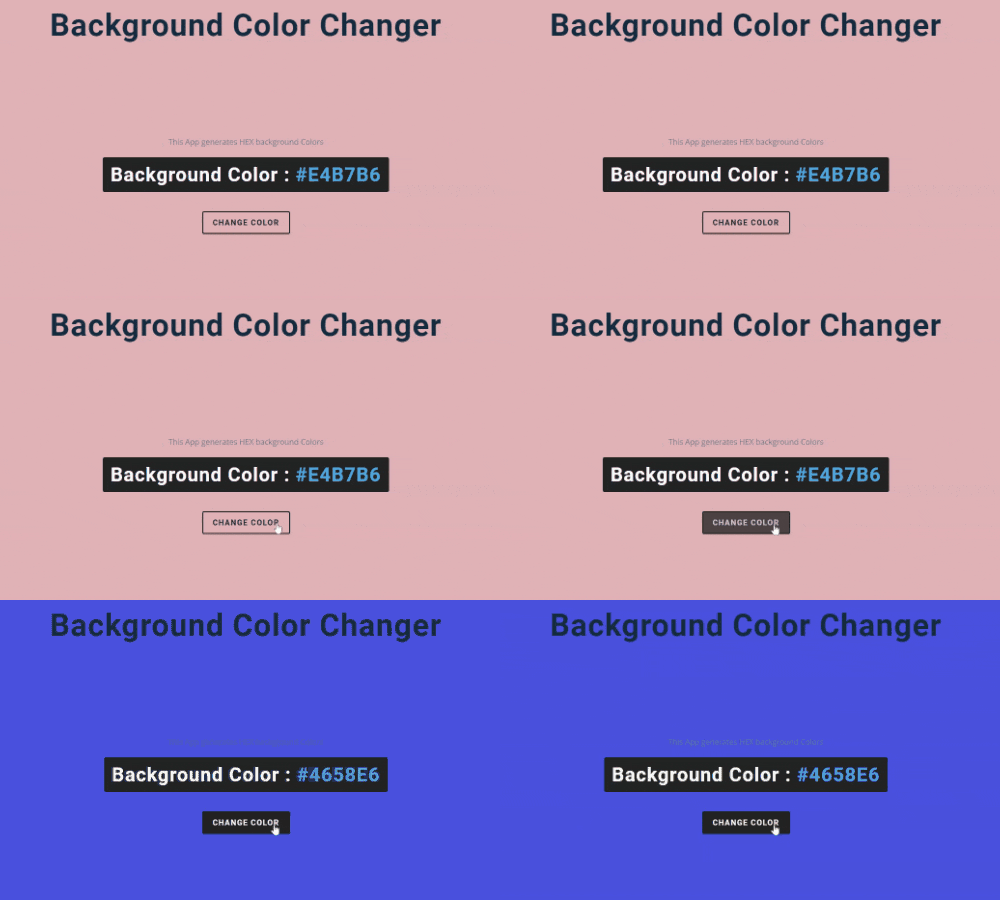
Working Project:
The goal of this project is to be able to change the HEX background colour of the body container each time a button is clicked. The interesting part is that the six characters that make up a single HEX colour, will be randomly generated and assigned to the background colour property of the body container.
JavaScript concepts that'll be applied:
Array
Loops
Concatenating Strings with the Plus Equals Operator
DOM Manipulation
Event Handling
Functions
If you're not very conversant with these concepts, I've added links to video and article tutorials to the resources section of the article to bring you up to speed.
I have also provided the HTML and CSS codes which you can copy to your local machine so we can only focus on the JavaScript logic.
HTML Codes:
<!DOCTYPE html>
<html lang="en">
  <head>
    <meta charset="UTF-8" />
    <meta name="viewport" content="width=device-width, initial-scale=1.0" />
    <title>Background Colour Changer</title>

    <!-- styles -->
    <link rel="stylesheet" href="styles.css" />
  </head>

  <body>
    <h1>Background Color Changer</h1>
    <main>
      <div class="container">
        <p>This App generates HEX background Colors</p>
        <h2>background color : <span class="color">#f1f5f8</span></h2>
        <button class="btn btn-hero" id="btn">Change Color</button>
      </div>
    </main>
    <!-- javascript -->
    <script src="hex.js"></script>
  </body>
</html>
CSS Codes:
/*
===============
Fonts
===============
*/
@import url("https://fonts.googleapis.com/css?family=Open+Sans|Roboto:400,700&display=swap");

/*
===============
Variables
===============
*/

:root {
  /* dark shades of primary color*/
  --clr-primary-1: hsl(205, 86%, 17%);
  --clr-primary-2: hsl(205, 77%, 27%);
  --clr-primary-3: hsl(205, 72%, 37%);
  --clr-primary-4: hsl(205, 63%, 48%);
  /* primary/main color */
  --clr-primary-5: hsl(205, 78%, 60%);
  /* lighter shades of primary color */
  --clr-primary-6: hsl(205, 89%, 70%);
  --clr-primary-7: hsl(205, 90%, 76%);
  --clr-primary-8: hsl(205, 86%, 81%);
  --clr-primary-9: hsl(205, 90%, 88%);
  --clr-primary-10: hsl(205, 100%, 96%);
  /* darkest grey - used for headings */
  --clr-grey-1: hsl(209, 61%, 16%);
  --clr-grey-2: hsl(211, 39%, 23%);
  --clr-grey-3: hsl(209, 34%, 30%);
  --clr-grey-4: hsl(209, 28%, 39%);
  /* grey used for paragraphs */
  --clr-grey-5: hsl(210, 22%, 49%);
  --clr-grey-6: hsl(209, 23%, 60%);
  --clr-grey-7: hsl(211, 27%, 70%);
  --clr-grey-8: hsl(210, 31%, 80%);
  --clr-grey-9: hsl(212, 33%, 89%);
  --clr-grey-10: hsl(210, 36%, 96%);
  --clr-white: #fff;
  --clr-red-dark: hsl(360, 67%, 44%);
  --clr-red-light: hsl(360, 71%, 66%);
  --clr-green-dark: hsl(125, 67%, 44%);
  --clr-green-light: hsl(125, 71%, 66%);
  --clr-black: #222;
  --ff-primary: "Roboto", sans-serif;
  --ff-secondary: "Open Sans", sans-serif;
  --transition: all 0.3s linear;
  --spacing: 0.1rem;
  --radius: 0.25rem;
  --light-shadow: 0 5px 15px rgba(0, 0, 0, 0.1);
  --dark-shadow: 0 5px 15px rgba(0, 0, 0, 0.2);
  --max-width: 1170px;
  --fixed-width: 620px;
}
/*
===============
Global Styles
===============
*/

*,
::after,
::before {
  margin: 0;
  padding: 0;
  box-sizing: border-box;
}
body {
  font-family: var(--ff-secondary);
  background: var(--clr-grey-10);
  color: var(--clr-grey-1);
  line-height: 1.5;
  font-size: 0.875rem;
}
ul {
  list-style-type: none;
}
a {
  text-decoration: none;
}
h1,
h2,
h3,
h4 {
  letter-spacing: var(--spacing);
  text-transform: capitalize;
  line-height: 1.25;
  margin-bottom: 0.75rem;
  font-family: var(--ff-primary);
}
h1 {
  font-size: 3rem;
  margin-top: 20px;
  text-align: center;
}
h2 {
  font-size: 2rem;
}
h3 {
  font-size: 1.25rem;
}
h4 {
  font-size: 0.875rem;
}
p {
  margin-bottom: 1.25rem;
  color: var(--clr-grey-5);
}
@media screen and (min-width: 800px) {
  h1 {
    font-size: 4rem;
  }
  h2 {
    font-size: 2.5rem;
  }
  h3 {
    font-size: 1.75rem;
  }
  h4 {
    font-size: 1rem;
  }
  body {
    font-size: 1rem;
  }
  h1,
  h2,
  h3,
  h4 {
    line-height: 1;
  }
}
/*  global classes */

/* section */
.section {
  padding: 5rem 0;
}

.section-center {
  width: 90vw;
  margin: 0 auto;
  max-width: 1170px;
}
@media screen and (min-width: 992px) {
  .section-center {
    width: 95vw;
  }
}
main {
  min-height: 100vh;
  display: grid;
  place-items: center;
}

/*

===============
Container
===============
*/
main {
  min-height: calc(100vh - 3rem);
  display: grid;
  place-items: center;
}
.container {
  text-align: center;
}
.container h2 {
  background: var(--clr-black);
  color: var(--clr-white);
  padding: 1rem;
  border-radius: var(--radius);
  margin-bottom: 2.5rem;
}
.color {
  color: var(--clr-primary-5);
}
.btn-hero {
  font-family: var(--ff-primary);
  text-transform: uppercase;
  background: transparent;
  color: var(--clr-black);
  letter-spacing: var(--spacing);
  display: inline-block;
  font-weight: 700;
  transition: var(--transition);
  border: 2px solid var(--clr-black);
  cursor: pointer;
  box-shadow: 0 1px 3px rgba(0, 0, 0, 0.2);
  border-radius: var(--radius);
  font-size: 1rem;
  padding: 0.75rem 1.25rem;
}
.btn-hero:hover {
  color: var(--clr-white);
  background: var(--clr-black);
}
Now the javascript:
There are 16 possible characters in the hexadecimal number system but we only need six characters to make a hex colour. Let's have an array of all 16 characters:
const hex = [0, 1, 2, 3, 4, 5, 6, 7, 8, 9, "A", "B", "C", "D", "E", "F"];
Secondly, if you look at the HTML code you'll see that we'll need to grab hold of the button and colour containers using their class and ID respectively,
 <h2>background color : <span class="color">#f1f5f8</span></h2>
   <button class="btn btn-hero" id="btn">Change Color</button>
in order to manipulate them in our javascript:
const hex = [0, 1, 2, 3, 4, 5, 6, 7, 8, 9, "A", "B", "C", "D", "E", "F"];

const btn = document.getElementById('btn');
const color = document.querySelector('.color');
Now, let's have a function that will generate a random number based on the length of the hex array. You can learn how to generate a random number from this article.
const hex = [0, 1, 2, 3, 4, 5, 6, 7, 8, 9, "A", "B", "C", "D", "E", "F"];

const btn = document.getElementById('btn');
const color = document.querySelector('.color');

function generateHexValue() {
  return Math.floor(Math.random() * hex.length);
}
Next, we'll need to add an event listener to the button. The event listener will take an event called 'click', and an event handler that will perform an operation when the button is clicked.
btn.addEventListener('click', () => {
 //codes for event handler
});
The event handler is a callback function that will:
create a string variable called hexColor that will take a default value of '#'. Remember that all hex colours must start with the '#' sign.
create a loop that will run six times (because we have six hex characters to generate after the '#'). On each iteration, the loop will call the generateHexValue() function to generate a random number, attach the generated number as an index to the hex array and finally assign the value from that array index to the hexColor string.
access the DOM and use the generated hexColor to manipulate the style of the background colour of the body
access the DOM and also use the generated hexColor to manipulate the text content of the colour container
const hex = [0, 1, 2, 3, 4, 5, 6, 7, 8, 9, "A", "B", "C", "D", "E", "F"];

const btn = document.getElementById('btn');
const color = document.querySelector('.color');

function generateHexValue() {
  return Math.floor(Math.random() * hex.length);
}

btn.addEventListener('click', () => {
  let hexColor = "#";
  for (i = 0; i < 6; i++) {
    hexColor += hex[generateHexValue()];
    generateHexValue();
  }
  document.body.style.backgroundColor = hexColor;
  color.textContent = hexColor;
});
And we're done! Check out the result:

Conclusion
We have learned how to use JavaScript to change the background colour of a webpage. We have also learned how to add a button and function to change the background colour randomly. This project can be a good starting point for more advanced projects and help you to build a solid foundation in JavaScript. With the knowledge gained from this article, you can build more complex projects and take your skills to the next level.
Watch out for Project 2/30 soon. Thanks for reading!
Resources
Video: JavaScript Crash Course For Beginners by Traversy Media: youtube.com/watch?v=hdI2bqOjy3c
Array: 2:55
Loops: 7:24
Concatenating Strings with the Plus Equals Operator: 12:06
DOM Manipulation: 14:45
Event Handling: 21:35
Functions: 26:30
Article: "JavaScript Fundamentals for Beginners" by Flavio Copes flaviocopes.com/javascript
Please note that some of the tutorials may not cover all the concepts I listed but it is really a good place to start.
Credits
Special credit goes to John Smilger for using his projects in this article series.
